[플러터구현2] 플러터로 프로필 만들기 Drawer, UserAccountsDrawerHeader, ListTile 활용 (코드 설명 포함)
2022. 4. 21. 19:52ㆍFlutter 플러터/플러터 공부기록
1. 앱바에 아이콘
appbar 왼쪽에는 leading, 오른쪽에는 actions [] 를 사용해 아이콘들을 넣을 수 있다.
이때 actoins 안에는 IconButton의 형태로 아이콘이 들어간다.
      appBar: AppBar(
        title: const Text('앱바 부분'),
        centerTitle: true,
        actions: [
          IconButton(
            onPressed: () {
              // ---
            },
            icon: const Icon(Icons.shopping_cart),
          ),
          IconButton(
            onPressed: () {
              // ---
            },
            icon: const Icon(Icons.search),
          ),
        ],
      ),
2. Drawer
scaffold 안에서 appbar, body, bottomnavigation에 더해 개인 프로필 등을 나타낼 수 있는 drawer가 있다.
drawer는 자식요소로 Listview를 가지고 (스크롤 되는 칼럼이라고 생각하면 편하다) Listview도 Column 처럼 children [] 안에 요소들을 담는다.
이때, 크게 UserAccountsDrawerHeader와 ListTile로 나뉜다.
전자

코드
            UserAccountsDrawerHeader(
              currentAccountPicture: const CircleAvatar(
                backgroundImage: AssetImage('images/main.png'),
              ),
              otherAccountsPictures: const [
                CircleAvatar(
                  backgroundImage: AssetImage('images/freeicon.jpg'),
                ),
                CircleAvatar(
                  backgroundImage: AssetImage('images/lalala.jpg'),
                )
              ],
              accountName: const Text('Pikachu'),
              accountEmail: const Text('pikachu@naver.com'),
              decoration: BoxDecoration(
                  color: Colors.yellow[400],
                  borderRadius: const BorderRadius.only(
                      bottomLeft: Radius.circular(40),
                      bottomRight: Radius.circular(40))),
            ),
후자
코드
            // 첫번째 Tile
            ListTile(
              // 홈 아이콘 + 글자 home
              leading: const Icon(
                Icons.home,
                color: Colors.black,
              ),
              title: const Text('Home'),
              onTap: () {
                debugPrint('Home is clicked');
              },
              trailing: const Icon(Icons.add),
            ),
            // 두번째 Tile
            ListTile(
              // 설정 아이콘 + 글자 설정
              leading: const Icon(
                Icons.settings,
                color: Colors.black,
              ),
              title: const Text('설정'),
              onTap: () {
                debugPrint('설정 is clicked');
              },
              // trailing: const Icon(Icons.add),
            ),
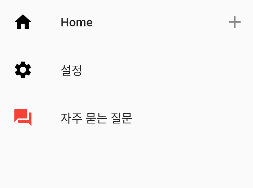
이렇게 하면 Drawer에서 윗부분 헤더와 아랫부분의 목록 LIst Tile들을 만들 수 있다.
전체코드
import 'package:flutter/material.dart';

void main() {
  runApp(const MyApp());
}

class MyApp extends StatelessWidget {
  const MyApp({Key? key}) : super(key: key);

  @override
  Widget build(BuildContext context) {
    return MaterialApp(
      title: 'Flutter Demo',
      theme: ThemeData(
        primarySwatch: Colors.yellow,
      ),
      home: const MyHomePage(),
    );
  }
}

class MyHomePage extends StatelessWidget {
  const MyHomePage({Key? key}) : super(key: key);

  @override
  Widget build(BuildContext context) {
    return Scaffold(
      appBar: AppBar(
        title: const Text('앱바 부분'),
        centerTitle: true,
        actions: [
          IconButton(
            onPressed: () {
              // ---
            },
            icon: const Icon(Icons.shopping_cart),
          ),
          IconButton(
            onPressed: () {
              // ---
            },
            icon: const Icon(Icons.search),
          ),
        ],
      ),
      body: const Center(
        child: Text(''),
      ),
      drawer: Drawer(
        child: ListView(
          children: [
            UserAccountsDrawerHeader(
              currentAccountPicture: const CircleAvatar(
                backgroundImage: AssetImage('images/main.png'),
              ),
              otherAccountsPictures: const [
                CircleAvatar(
                  backgroundImage: AssetImage('images/freeicon.jpg'),
                ),
                CircleAvatar(
                  backgroundImage: AssetImage('images/lalala.jpg'),
                )
              ],
              accountName: const Text('Pikachu'),
              accountEmail: const Text('pikachu@naver.com'),
              decoration: BoxDecoration(
                  color: Colors.yellow[400],
                  borderRadius: const BorderRadius.only(
                      bottomLeft: Radius.circular(40),
                      bottomRight: Radius.circular(40))),
            ),

            // 첫번째 Tile
            ListTile(
              // 홈 아이콘 + 글자 home
              leading: const Icon(
                Icons.home,
                color: Colors.black,
              ),
              title: const Text('Home'),
              onTap: () {
                debugPrint('Home is clicked');
              },
              trailing: const Icon(Icons.add),
            ),
            // 두번째 Tile
            ListTile(
              // 설정 아이콘 + 글자 설정
              leading: const Icon(
                Icons.settings,
                color: Colors.black,
              ),
              title: const Text('설정'),
              onTap: () {
                debugPrint('설정 is clicked');
              },
              // trailing: const Icon(Icons.add),
            ),
            // 세번째 Tile
            ListTile(
              // 설정 아이콘 + 글자 설정
              leading: const Icon(
                Icons.question_answer,
                color: Colors.red,
              ),
              title: const Text('자주 묻는 질문'),
              onTap: () {
                debugPrint('질의응답 is clicked');
              },
            ),
          ],
        ),
      ),
    );
  }
}'Flutter 플러터 > 플러터 공부기록' 카테고리의 다른 글
| 플러터 flutter listview.builder로 한번에 목록 구현 (0) | 2022.04.28 |
|---|---|
| 플러터 Flutter 키보드 구현하고 입력된 값 팝업으로 띄우기 (0) | 2022.04.26 |
| 플러터 Flutter Stateful widget 예제 (코드 설명 포함) (0) | 2022.04.26 |
| Flutter 플러터 환경변수 설정방법 (윈도우, Windows) (0) | 2022.04.18 |
| 플러터 flutter 프로젝트 생성하고 위젯으로 글씨, 이미지 삽입, 그림 넣기, 박스 만들기 (0) | 2022.04.13 |