2022. 4. 21. 21:45ㆍ카테고리 없음
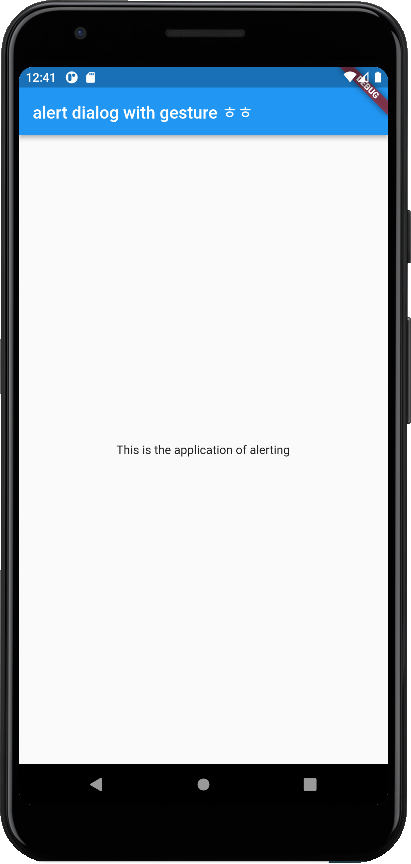
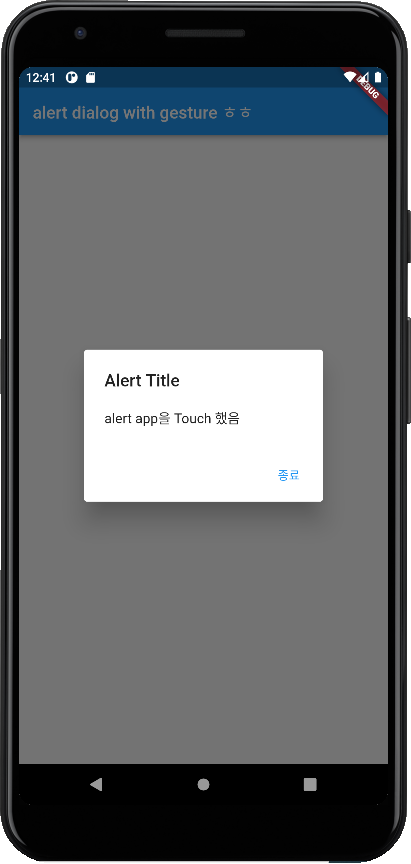
1. 완성된 화면
왼쪽 화면에서 가운데 글씨를 누르면 오른쪽 사진이 뜨고, 알림창의 종료 버튼을 누르면 다시 원래 페이지로 돌아간다.
2. 전체 코드
import 'package:flutter/material.dart';

void main() {
  runApp(const MyApp());
}

class MyApp extends StatelessWidget {
  const MyApp({Key? key}) : super(key: key);

  // This widget is the root of your application.
  @override
  Widget build(BuildContext context) {
    return MaterialApp(
      title: 'Flutter Demo',
      theme: ThemeData(
        primarySwatch: Colors.blue,
      ),
      home: const MyHomePage(),
    );
  }
}

class MyHomePage extends StatelessWidget {
  const MyHomePage({Key? key}) : super(key: key);

  @override
  Widget build(BuildContext context) {
    return Scaffold(
      appBar: AppBar(
        title: const Text('alert dialog with gesture ㅎㅎ'),
      ),
      body: Center(
        child: GestureDetector(
            onTap: () {
              _showDialog(context);
            },
            child: const Text('This is the application of alerting')),
      ),
    );
  }

  // stateless 위젯 안의 첫번째 위젯에서 쓸 showdialog 함수니깐 여기다 만들어야지 stl 밖에다 만들면 안됨. _ 언더바 있어서 private이거든
  _showDialog(BuildContext context) {
    showDialog(
        context: context,
        // 창을 닫게끔, 종료버튼 이외의 것을 누르면 창 안닫히게 하려면
        barrierDismissible: false,
        builder: (BuildContext ctx) {
          return AlertDialog(
            title: const Text('Alert Title'),
            content: const Text('alert app을 Touch 했음'),
            actions: [
              TextButton(
                onPressed: () {
                  Navigator.of(ctx).pop();
                },
                child: const Text('종료'),
              ),
            ],
          );
        });
  }
}
3. 코드 설명
1. gesture detector 생성
Material app에서 Scaffold를 부르면 상단, 중단 그리고 하단부로 나눠서 앱을 디자인할 수 있다. 이때 appbar, body, bottomnavigationbar 중 경고메시지는 가운데 뜨니까 (쉽게 생각해서) body의 자식요소로 보면 된다.
  @override
  Widget build(BuildContext context) {
    return Scaffold(
      appBar: AppBar(
        title: const Text('alert dialog with gesture ㅎㅎ'),
      ),
      body: Center(
        child: GestureDetector(

      ),
    );
  }
2. 탭할 때 보여줄 경고창 함수 작성
먼저, onTap () {} 함수가 내장되어있는 것을 이용해 눌렀을 경우 어떤 함수를 부를 것인지 정의한다.
        child: GestureDetector(
            onTap: () {
              _showDialog(context);
            },
      )
다음으로, onTap이 시행될 때 불러올 함수를 정의한다.
class MyHomePage extends StatelessWidget {
  const MyHomePage({Key? key}) : super(key: key);

  @override
  Widget build(BuildContext context) {
    return Scaffold(
      appBar: AppBar(
        title: const Text('alert dialog with gesture ㅎㅎ'),
      ),
      body: Center(
        child: GestureDetector(
            onTap: () {
              _showDialog(context);
            },
            child: const Text('This is the application of alerting')),
      ),
    );
  }

  // stateless 위젯 안의 첫번째 위젯에서 쓸 showdialog 함수니깐 여기다 만들어야지 stl 밖에다 만들면 안됨. _ 언더바 있어서 private이거든
  _showDialog(BuildContext context) {
    showDialog(
    );
  }
}
참고로 dart 언어에서 함수 선언 시 앞에 _ 붙이면 private, 없으면 public 이다. 나는 private으로 선언했기 때문에 함수가어디서 쓰이고 버려지는지를 보고 함수 위치를 결정해야했다.
일단 전체 코드에서 main 함수가 MyApp을 부르고 MyApp이 MyHomePage를 부르며, 이 함수 내에서 알림창 / 경고창이 진행될 예정이므로 이 함수가 끝나기 전 범위에 _showDialog 함수를 안에 넣어주었다.
단, scaffold 밖에서 불러야하므로 위젯을 빌드하는 부분이 끝난 곳에서 _showDialog를 선언했다.
3. 알림창 기본 설정
탭이 이뤄졌을 때 해당 함수를 부르면서 함께 받아올 파라미터 (context)를 정의하고, 알림창 종료 버튼 이외의 부분을눌렀을 때 창이 꺼지지 않게 하는 기능인 barrierDismissible을 추가하고, builder를 통해 알림창을 구현할 준비를 마친다.
  _showDialog(BuildContext context) {
    showDialog(
        context: context,
        // 창을 닫게끔, 종료버튼 이외의 것을 누르면 창 안닫히게 하려면
        barrierDismissible: false,
    );
  }
}
4. 알림창 최종 구현
title은 알림창 제목, content 는 알림이나 경고문구의 부연설명, 그리고 종료버튼을 만들 수 있다.
appbar, drawer처럼 메인 페이지가 아니라 특정 기능과 세부 설정에 연관된 자식들은 actions에 담기므로 알림창을 종료하는 버튼 역시 actions 안에 담는다.
  _showDialog(BuildContext context) {
    showDialog(
        context: context,
        // 창을 닫게끔, 종료버튼 이외의 것을 누르면 창 안닫히게 하려면
        barrierDismissible: false,
        builder: (BuildContext ctx) {
          return AlertDialog(
            title: const Text('Alert Title'),
            content: const Text('alert app을 Touch 했음'),
            actions: [
              TextButton(
                onPressed: () {
                  Navigator.of(ctx).pop();
                },
                child: const Text('종료'),
              ),
            ],
          );
        });
  }
}